We had a lovely time in Crieff, the hotel was great, the food fantastic and even the weather was fine. We just relaxed and read books.
Today it has rained all day!!! We are now all packed up (well nearly!) and tomorrow we head off to Yorkshire for two weeks holiday - I hope the sun decides to shine! But we will enjoy it anyway. On the way home I stop off at Durham for a weeks residential summer school with the Open University. Dreading that a bit at the moment, but Im sure it will be fine when I'm there.
I probably won't get back blogging for three weeks (what will I do!).
A place where I can share some things from the different bits of my life and my hobbies.
Friday 13 July 2007
Sunday 8 July 2007
Schools Out for Summer!
School finally finished on Friday for the summer holidays - 6 weeks of rest and relaxation (well as much as you can get with two children!). To keep ourselves busy over the summer we have all decided to keep a Holiday Journal and put in it challenges, places we visit, books we read, films we see and anything else interesting we do. Here is Andrew's front cover and my front cover.


Andrew is really into doing this and has decided one of his challenges is to learn to ride his bike without stabilisers. He has also signed up for the library summer reading scheme, Big Wild Read, and has chosen his first few books and planted his seeds.
The boys are now away to their Auntie in Glasgow for a few days while Gordon and I head off to Crieff for a couple of nights relaxation.
All we need now is the sun!!
Tuesday 3 July 2007
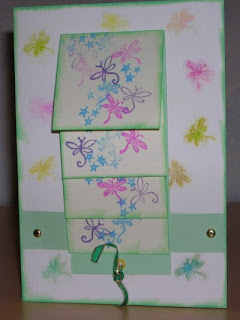
Waterfall Card

I did another workshop last night, the last until after the summer. We were doing waterfall cards, which all the ladies enjoyed. Here are the instructions I gave out, in case anyone wants to know how to make one. They are really very easy to make but very effective.

Instructions for use with C6 size card (A5 folded over).
Stamp or decorate background of card.
Cut four squares 2” x 2”, stamp your design onto these squares.
Cut a strip of card 9” x 2”. Start at end of strip, score 2”, 2 ¾”, 3 ½” and 4 ¼ “ . Fold along scored lines. (Piece A)
Cut a strip ¾” x 4” attach to front of card with eyelets or brads, near bottom of card.
Attach first piece of card (piece A) to horizontal strip by sliding longest section of card between horizontal strip and the card, making sure to centre it. Line up the very edge of the scored end of piece A with bottom of horizontal strip and attach with adhesive. Please make sure you do not attach the scored side and the longest section of piece A together.
Attach your first stamped square to the bottom space at the scored end of piece A.
Apply adhesive to the scored sections of piece A only and attach remaining stamped squares.
Attach eyelet and ribbon to the bottom of piece A.
You should now be able to gently pull the bottom of longest section of piece A down and watch the stamped images flip one at a time and slide behind piece A.
Subscribe to:
Posts (Atom)